Best in: Spring, Summer, Fall, Winter
Ingredients (scaled)
20 servings
Directions
Preheat oven 425 F fan
Weigh out the butter whilst cubing it and leave out to come to room temperature.
Lightly oil or grease the baking tray(s) and place baking/parchment paper on top.
Weigh or measure in the flour into the bowl, spoon in the baking powder, give it a mix through drop in the butter.
Using your fingertips, rub the butter into the flour continue to do this until the mixture resembles breadcrumbs, (very tiny pieces). I use a pastry cutter for this job as my fingers get sore. You push down into the bowl and do a squishing motion whilst turning the cutter left and right. Repeat this until all the butter is now in very tiny pieces with the flour. See Photo 2 above.
Put the bowl back onto the scales and weigh in the sugar. Give it a good mix through.
Beat the eggs in a jug and then top up to the 300ml (10 fl oz) mark with the milk, (depending on the size of the eggs, you might not need as much milk).
Give the liquid a good mix and then take 2 tbsp of it out and place in a small bowl to use later. See Photo 3.
Gradually add the egg/milk mixture to the dry ingredients until a soft dough is formed. Be aware that the dough being a little sticky is good for the scones to rise. So only add enough of the liquid until just sticky. **So you may not need all the liquid.
Flour a pastry board or worktop or use some baking/parchment paper with a little flour on top.
Meanwhile put the dough down and flatten gently with your hands until you have a level piece of dough about 1 inch (2.5cm) high. (Kids, measure this with a ruler). Try not to go smaller than this. Dont be tempted to roll out the dough as this wont help the scones to rise. See Photo 5.
Flour the cutter or glass and cut out the scones. Push the cutter down and DO NOT TWIST the cutter. I know its tempting, but twisting can ruin the end structure of the scones - you want that characteristic rise split appearance of a good scone. Use a spatula or knife to very carefully transfer to the prepared baking tray. (or let it fall onto te prepared tray). Try to touch the sides of the scones as little as possible. See Photo 6.
Gently roll up the scraps of dough by hand and flatten out to cut out however more scones you can get, remembering not to knead and handle as little as possible.
Now using a pastry brush, very carefully brush the egg/milk liquid you reserved earlier onto the tops of the scones only. If the liquid goes down the sides, it can ruin the rise of the scones. So, the best way to avoid it is by shaking the brush before moving to the scone and starting to brush from the centre and go outwards, so there is less liquid on the brush to spill down the sides. See Photo 7 above.
Bake for 8-12 minutes until well risen and golden in colour. Now I like to turn and rotate the baking trays between the shelves during baking, to ensure an even bake, (but I need a new oven!). See Photo 8 opposite.
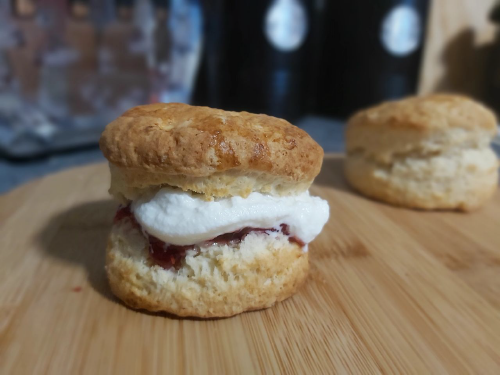
Cool a little on a cooling rack and enjoy warm with whatever fillings you enjoy.
**You can freeze these scones and once defrosted, heat a little in a warm oven.
Weigh out the butter whilst cubing it and leave out to come to room temperature.
Lightly oil or grease the baking tray(s) and place baking/parchment paper on top.
Weigh or measure in the flour into the bowl, spoon in the baking powder, give it a mix through drop in the butter.
Using your fingertips, rub the butter into the flour continue to do this until the mixture resembles breadcrumbs, (very tiny pieces). I use a pastry cutter for this job as my fingers get sore. You push down into the bowl and do a squishing motion whilst turning the cutter left and right. Repeat this until all the butter is now in very tiny pieces with the flour. See Photo 2 above.
Put the bowl back onto the scales and weigh in the sugar. Give it a good mix through.
Beat the eggs in a jug and then top up to the 300ml (10 fl oz) mark with the milk, (depending on the size of the eggs, you might not need as much milk).
Give the liquid a good mix and then take 2 tbsp of it out and place in a small bowl to use later. See Photo 3.
Gradually add the egg/milk mixture to the dry ingredients until a soft dough is formed. Be aware that the dough being a little sticky is good for the scones to rise. So only add enough of the liquid until just sticky. **So you may not need all the liquid.
Flour a pastry board or worktop or use some baking/parchment paper with a little flour on top.
Meanwhile put the dough down and flatten gently with your hands until you have a level piece of dough about 1 inch (2.5cm) high. (Kids, measure this with a ruler). Try not to go smaller than this. Dont be tempted to roll out the dough as this wont help the scones to rise. See Photo 5.
Flour the cutter or glass and cut out the scones. Push the cutter down and DO NOT TWIST the cutter. I know its tempting, but twisting can ruin the end structure of the scones - you want that characteristic rise split appearance of a good scone. Use a spatula or knife to very carefully transfer to the prepared baking tray. (or let it fall onto te prepared tray). Try to touch the sides of the scones as little as possible. See Photo 6.
Gently roll up the scraps of dough by hand and flatten out to cut out however more scones you can get, remembering not to knead and handle as little as possible.
Now using a pastry brush, very carefully brush the egg/milk liquid you reserved earlier onto the tops of the scones only. If the liquid goes down the sides, it can ruin the rise of the scones. So, the best way to avoid it is by shaking the brush before moving to the scone and starting to brush from the centre and go outwards, so there is less liquid on the brush to spill down the sides. See Photo 7 above.
Bake for 8-12 minutes until well risen and golden in colour. Now I like to turn and rotate the baking trays between the shelves during baking, to ensure an even bake, (but I need a new oven!). See Photo 8 opposite.
Cool a little on a cooling rack and enjoy warm with whatever fillings you enjoy.
**You can freeze these scones and once defrosted, heat a little in a warm oven.
Notes
Click to add notes...
Nutrition Facts (per serving)
Calories
g
Protein
g
Carbs
g
Fat
g
Fiber
g
Sugar
mg
Sodium
mg
Cholesterol